
TL;DR
Automate portfolio rebalancing inside your EVM wallet using Mimic Protocol. This guide shows how to build a function that rebalances three ERC-20 tokens to target USD weights (in basis points), applies slippage protection, and deploys to the Mimic Protocol.
Quick Details
- Function type: portfolio rebalancing (3 tokens, USD targets)
- Strategy: move value from surplus → deficit tokens until targets are met
- Key inputs: tokenA/B/C, targetBpsA/B/C (sum to 10,000), slippageBps, chainId
This is just an example, Mimic Protocol allows for any type of logic to create a wallet rebalancing strategy.
What You Need to Get Started

Understand the Rebalancing Flow
We want to maintain fixed USD weights across three tokens (for example, 50% / 30% / 20%). Each time the strategy runs, it follows this process:
- Check balances: Read your wallet balances for tokens A, B, and C.
- Convert to USD: Use on-chain pricing to calculate the USD value of each token balance.
- Set targets: Based on your chosen allocation (e.g., 50/30/20), compute the target USD value for each token.
- Find imbalances: Compare current vs. target balances
- Rebalance iteratively: Start swapping:
- Always swap from the largest surplus token into the largest deficit token.
- Finish when balanced: Continue swapping until either surpluses or deficits are resolved. At this point, allocations should match the targets (to integer precision).
Define the Function
1. Initialize project
Start a new working directory to develop your function:
npx @mimicprotocol/cli init ./my-mimic-function2. Update your manifest.yaml
The manifest file provides the configuration for your function, including:
- Metadata: Name, description, and version of the function.
- Inputs: Parameters required by the function logic.
- ABIs: Smart contract ABIs to generate type-safe interfaces for the function.
Save this configuration in the manifest.yaml file:
version: 1.0.0
name: Rebalance to USD target ratios (3 tokens)
description: Automated function that rebalances a 3-token portfolio to target basis-point weights using USD valuations and slippage-protected swaps
inputs:
  - chainId: uint32
  - tokenA: address
  - tokenB: address
  - tokenC: address
  - targetBpsA: uint16      # e.g., 5000 = 50%
  - targetBpsB: uint16      # must sum with A & C to 10000
  - targetBpsC: uint16
  - slippageBps: uint16     # e.g., 50 = 0.50%
abis:
  - ERC20: ./abis/ERC20.json
This manifest file defines different inputs that will be accessible from the function logic code thanks to the types generation process that will be explained in the next section.
It also declares the path for the ERC20 ABI required by the function logic. Similar to the inputs list, the ABIs will be processed to generate the proper types to access them from the codebase.
For the purpose of this example you can set the ERC20 ABI into ./abis/ERC20.json (just create a new folder called abis) by using this file:
You can adapt this to any rebalancing you want to create, just change the values for your desired tokens.
3. Generate types
This steps allows you to validate the manifest definitions and generate the corresponding code to access both your declared inputs.
To do this you can run the codegen command using the CLI:
mimic codegen
4. Write the function logic
The function logic is implemented in AssemblyScript and must export:
- Input type: The generated
inputstype from the previous step. - Main function: The core function logic, which receives the inputs as an argument.
Create a file ./src/function.ts (or update the pre-existing one), and implement the logic:
import { Address, BigInt, environment, ERC20Token, log, Swap, TokenAmount, USD } from '@mimicprotocol/lib-ts'

import { ERC20 } from './types/ERC20'
import { inputs } from './types'

// Basis points denominator (100% = 10,000 bps)
const BPS_DENOMINATOR = BigInt.fromI32(10_000)

// Return the minimum of two USD amounts
function usdMin(left: USD, right: USD): USD {
  return left.lt(right) ? left : right
}

// Compute a USD share given a bps ratio
function shareByBps(amountUSD: USD, bps: i32): USD {
  const numerator = amountUSD.times(BigInt.fromI32(bps))
  return numerator.div(BPS_DENOMINATOR)
}

// Read user's onchain ERC20 balance and wrap it as TokenAmount
function getTokenAmount(chainId: u32, tokenAddress: Address): TokenAmount {
  const me = environment.getContext().user
  const contract = new ERC20(tokenAddress, chainId)
  const balance = contract.balanceOf(me)
  const token = ERC20Token.fromAddress(tokenAddress, chainId)
  return TokenAmount.fromBigInt(token, balance)
}

// Helper structure to track surplus/deficit buckets in USD for each token index
class Bucket {
  constructor(
    public index: i32,
    public amountUSD: USD
  ) {}
}

export default function main(): void {
  // Read inputs: three tokens and their target portfolio weights in bps
  // Each target is expressed in basis points where 10,000 = 100%.
  // Example: [5000, 3000, 2000] => 50%, 30%, 20%.
  const tokenAddresses = [inputs.tokenA, inputs.tokenB, inputs.tokenC]
  const targetBps = [inputs.targetBpsA as i32, inputs.targetBpsB as i32, inputs.targetBpsC as i32]

  // Validate that targets add up to 100% to ensure a closed allocation that
  // fully assigns the current portfolio value across the three tokens.
  const totalTargetBps = targetBps[0] + targetBps[1] + targetBps[2]
  if (totalTargetBps != 10_000) throw new Error('Targets BPS must sum to 10000')

  // Initialize tokens for pricing/conversions
  // We use token data to convert between on-chain units and USD, so
  // we can compare heterogeneous assets on a common value scale.
  const tokensMetadata = [
    ERC20Token.fromAddress(tokenAddresses[0], inputs.chainId),
    ERC20Token.fromAddress(tokenAddresses[1], inputs.chainId),
    ERC20Token.fromAddress(tokenAddresses[2], inputs.chainId),
  ]

  // Fetch current user balances as TokenAmount
  // Balances are read on-chain for the function's caller (context user).
  const tokenAmounts = [
    getTokenAmount(inputs.chainId, tokenAddresses[0]),
    getTokenAmount(inputs.chainId, tokenAddresses[1]),
    getTokenAmount(inputs.chainId, tokenAddresses[2]),
  ]

  // Value current balances in USD and compute portfolio total
  // Using USD allows target computation and rebalancing independently of
  // token decimals and relative prices.
  const currentBalancesUsd = [tokenAmounts[0].toUsd(), tokenAmounts[1].toUsd(), tokenAmounts[2].toUsd()]
  const totalPortfolioUSD = currentBalancesUsd[0].plus(currentBalancesUsd[1]).plus(currentBalancesUsd[2])
  if (totalPortfolioUSD.le(USD.zero())) {
    log.info('No rebalance needed (total USD is zero)')
    return
  }

  // Compute desired USD balances per token based on target bps
  // This gives the ideal dollar amount we want allocated per token.
  const desiredBalancesUsd = [
    shareByBps(totalPortfolioUSD, targetBps[0]),
    shareByBps(totalPortfolioUSD, targetBps[1]),
    shareByBps(totalPortfolioUSD, targetBps[2]),
  ]

  // Build lists of surplus and deficit buckets (in USD)
  // Surplus: current > desired (we will sell some of this token)
  // Deficit: desired > current (we will buy this token)
  const surpluses = new Array<Bucket>()
  const deficits = new Array<Bucket>()
  for (let i: i32 = 0; i < 3; i++) {
    if (currentBalancesUsd[i].gt(desiredBalancesUsd[i])) {
      surpluses.push(new Bucket(i, currentBalancesUsd[i].minus(desiredBalancesUsd[i])))
    } else if (desiredBalancesUsd[i].gt(currentBalancesUsd[i])) {
      deficits.push(new Bucket(i, desiredBalancesUsd[i].minus(currentBalancesUsd[i])))
    }
  }

  // If either side is empty, portfolio already matches targets
  if (surpluses.length == 0 || deficits.length == 0) {
    log.info('No rebalance needed (target ratios matched)')
    return
  }

  // Swap from tokens with extra (surplus) to tokens that need more (deficit).
  // Always move the smaller USD amount between the two buckets.
  // Repeat until either the surplus or the deficit bucket is satisfied.
  let surplusIndex: i32 = 0
  let deficitIndex: i32 = 0
  while (surplusIndex < surpluses.length && deficitIndex < deficits.length) {
    const movedUSD = usdMin(surpluses[surplusIndex].amountUSD, deficits[deficitIndex].amountUSD)

    const surplusTokenIndex = surpluses[surplusIndex].index
    const deficitTokenIndex = deficits[deficitIndex].index

    // Convert USD amount to token in/out amounts using token metadata
    // The input token amount is what we sell; the expected output token amount
    // is the USD-equivalent we want to buy before slippage is applied.
    const amountInToken = movedUSD.toTokenAmount(tokensMetadata[surplusTokenIndex])
    const expectedOutToken = movedUSD.toTokenAmount(tokensMetadata[deficitTokenIndex])

    // Apply slippage tolerance to compute minimum acceptable output
    // `slippageBps` bounds the worst price movement we are willing to accept.
    // minimumOut = expectedOut * (1 - slippageBps/10000)
    const slippageFactor = BPS_DENOMINATOR.minus(BigInt.fromI32(inputs.slippageBps as i32))
    const minimumOutAmount = expectedOutToken.amount.times(slippageFactor).div(BPS_DENOMINATOR)

    // Execute swap from surplus token to deficit token with slippage protection
    Swap.create(
      inputs.chainId,
      tokensMetadata[surplusTokenIndex],
      amountInToken.amount,
      tokensMetadata[deficitTokenIndex],
      minimumOutAmount
    ).send()

    // Update remaining USD amounts in both buckets
    // We subtract the USD we just moved; if a bucket hits zero, advance.
    surpluses[surplusIndex].amountUSD = surpluses[surplusIndex].amountUSD.minus(movedUSD)
    deficits[deficitIndex].amountUSD = deficits[deficitIndex].amountUSD.minus(movedUSD)

    // Advance to next bucket if this one is fully satisfied
    if (surpluses[surplusIndex].amountUSD.le(USD.zero())) surplusIndex++
    if (deficits[deficitIndex].amountUSD.le(USD.zero())) deficitIndex++
  }

  // At this point, all surpluses have been swapped into deficits within the
  // provided slippage tolerance, approximating the target allocation.
  log.info('Rebalance executed')
}
You can set up a wallet rebalancing strategy with any ERC-20 token across all supported chains, including Arbitrum, Base, Base Sepolia, Ethereum, Gnosis, Optimism, and Sonic.
Every function is fully customizable, so you can adapt it to your preferred configuration. For details, explore the Mimic Protocol Library.
For now Mimic functions allows creating three types of intents: transfers, generic calls, and crosschain swaps.
5. Compile
The compile process converts your function logic and manifest into deployable artifacts:
build/function.wasm- Compiled WebAssembly binarybuild/manifest.json- Processed manifest configuration
Run the compile command:
yarn mimic compile
By default, outputs are saved in the build directory.
Here is an example of the output produced by this command:
build/
├── function.wasm     # Compiled WASM binary
├── manifest.json     # Validated manifest
6. Deploy your function
This is where you upload your function artifacts to the network so others can discover it. To do this you can run the deploy command using the CLI:
yarn mimic deploy --api-key [DEPLOYMENT_KEY]
You can generate a deployment key from the explorer app, where you can login using your wallet.
Link to Mimic Protocol Explorer: https://protocol.mimic.fi/
This command will deploy the generated artifacts from the build directory by default.
This command will upload your artifacts to the Mimic Registry (which stores them on IPFS) and pin the resultant CID so it can be discovered by others. The CID is also written to CID.json in the specified output directory.
7. Give allowance to the Mimic settler
Before you configure your function in the dashboard, you must allow the Mimic Settler contract to spend tokens on your behalf.
To grant this permission:
- Open your network’s block explorer and find your spending token contract.
- Connect your wallet.
- Set the Mimic Settler as the spender address.
- Approve the contract so it can manage the tokens needed for your function.
Mimic Settler contract:
0x609d831c0068844e11ef85a273c7f356212fd6d1
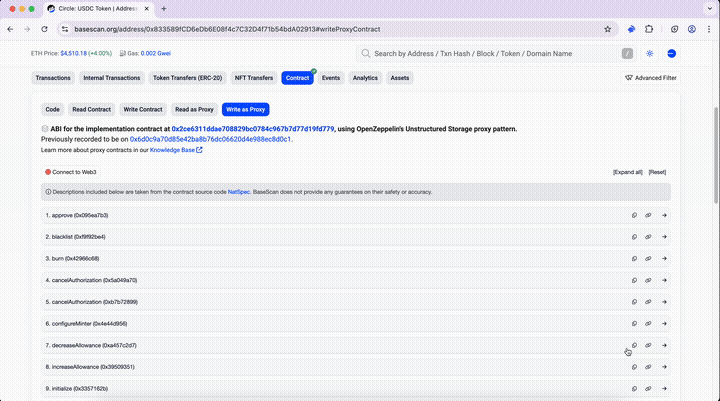
For example, for USDC on Base, you can go to the smart contract on basescan, click on "write as proxy", connect your wallet, and add approval to the Mimic settler.https://basescan.org/address/0x833589fCD6eDb6E08f4c7C32D4f71b54bdA02913#writeProxyContract

The spender is the Mimic settler, and the value depends on the token you want to use in uint256 (USDC has 6 decimals, so the amount + 6 extra zeros).
If you want to allow 20 USDC spending limit, you would write 20000000 (20 + 6 zeroes). Most explorers allow to add them easily as shown below.
Give allowance to the Mimic settler for the tokens you want to rebalance.
In this example USDC, WETH, and cbBTC on Base. You can go to the smart contracts on basescan, connect your wallet, and add approval to the Mimic settler: 0x609d831c0068844e11ef85a273c7f356212fd6d1
8. Configure your function
After deploying your function, you can now add a trigger, to tell which trigger relayers should use to run your function. This means defining the parameters declared in your manifest.yml file. This is done in the explorer UI where you will be requested to sign your trigger with your wallet or with the SDK.
- Open the explorer and locate the function you just deployed under the functions section.
- Add or edit your trigger parameters
- Sign the new trigger
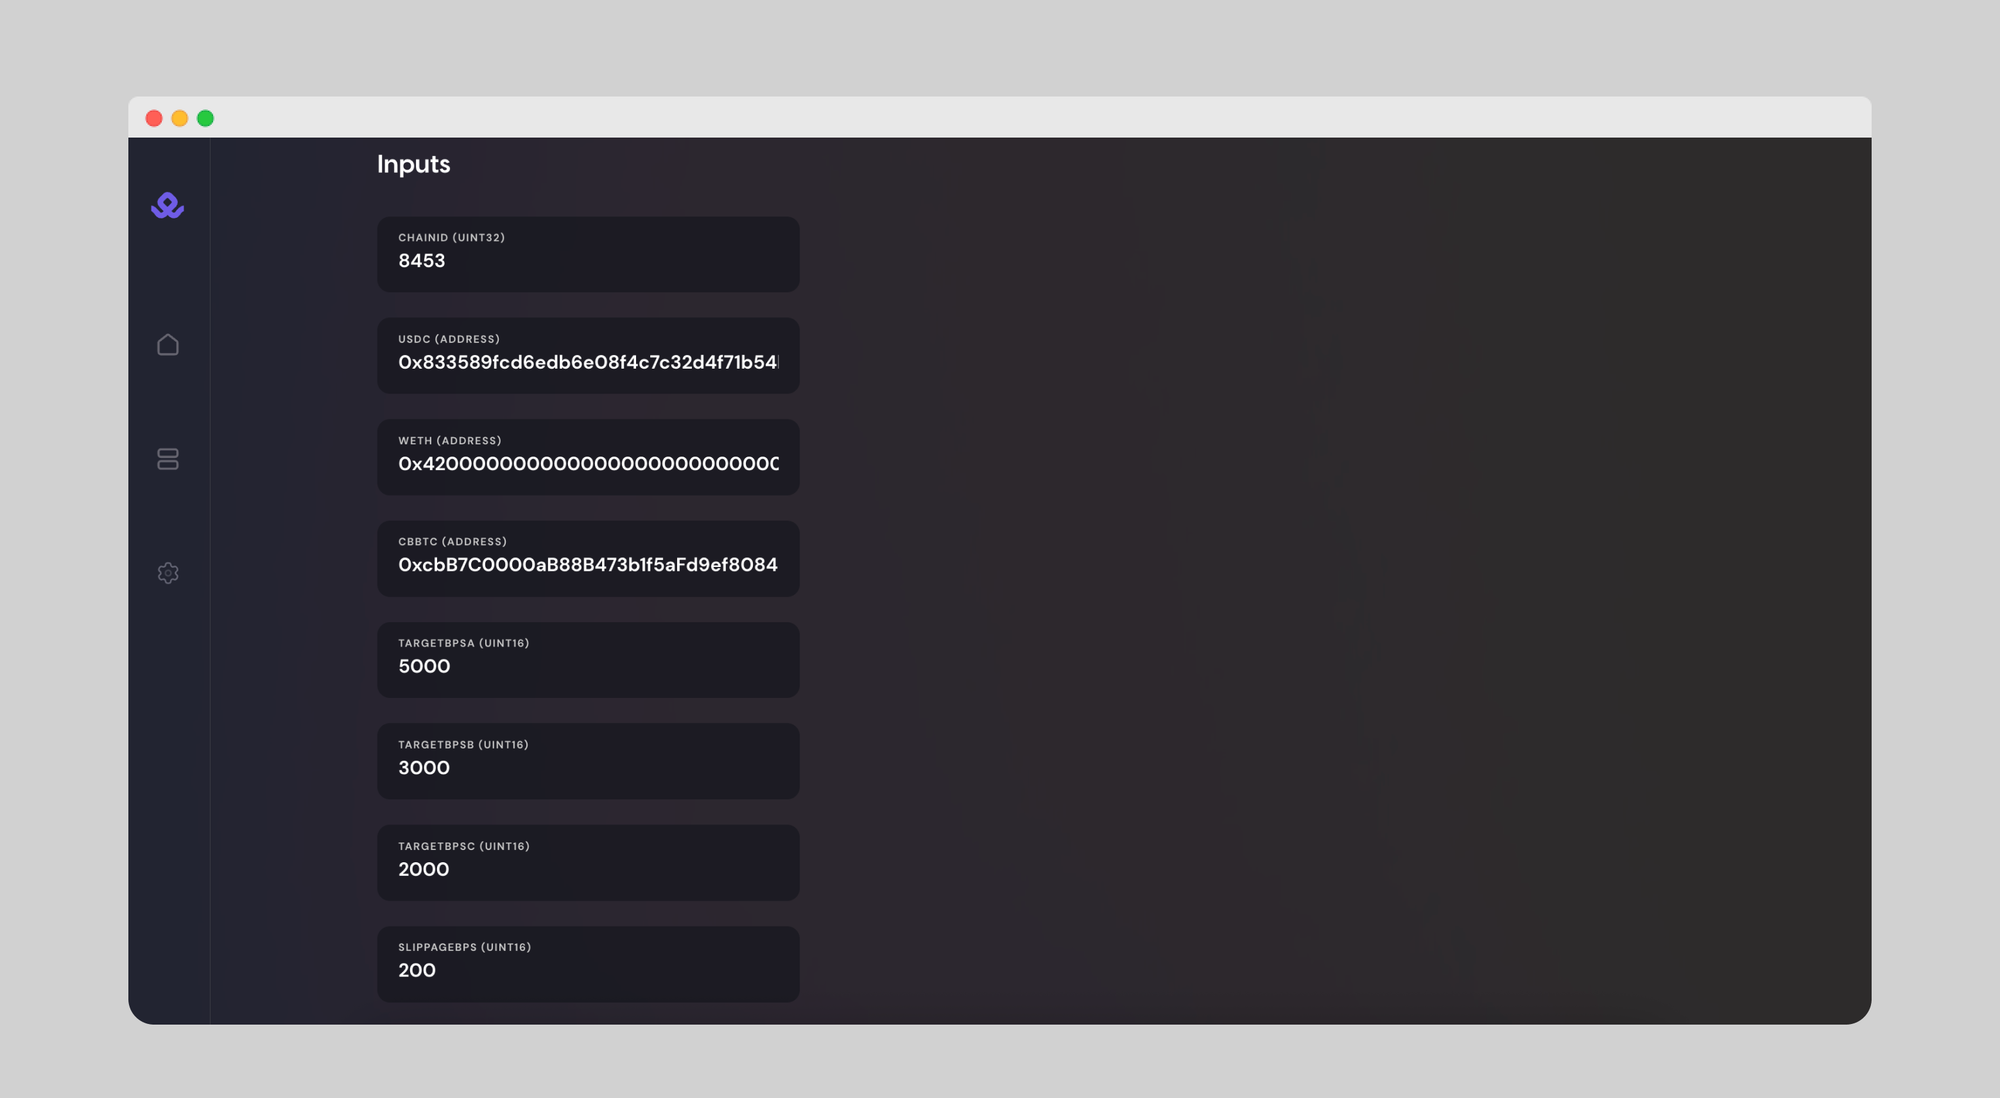
Remember that the targets (A,B,C) must sum a total of 10000 (100% in basis points). In this example:
8453 // CHAINID (Base)
0x833589fcd6edb6e08f4c7c32d4f71b54bda02913 // USDC (Base)
0x4200000000000000000000000000000000000006 // WETH (Base)
0xcbB7C0000aB88B473b1f5aFd9ef808440eed33Bf // cbBTC (Base)

5000 // USDC target in basis points (50%)
3000 // WETH target in basis points (30%)
2000 // cbBTC target in basis points (20%)
200 // 2% Slippage in basis point (1% = 100)
Finally set the delta (time window to execute), the end date (optional), and sign with your wallet
This signature ensures relayers know the trigger is authorized by the function owner.
You can update or deprecate this trigger at any point in time to reflect changes, without needing to redeploy the function code again. Just sign the new trigger in the explorer, and relayers will pick up the latest version.
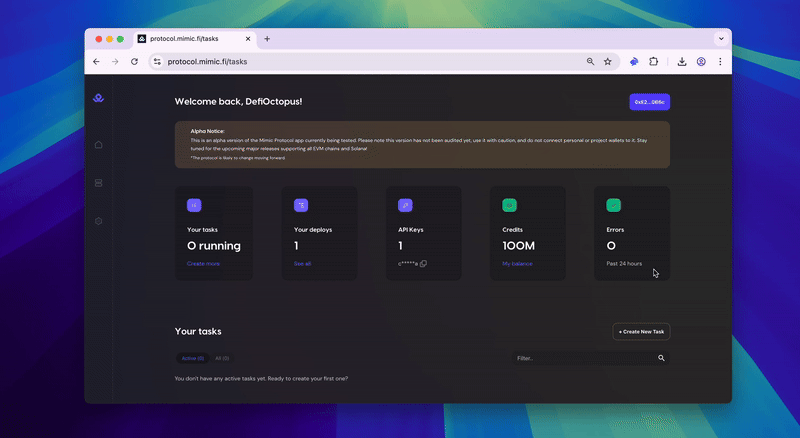
You will get a confirmation message: Function created successfully!
Below, you can see a summary of the function (how many runs, completions, and errors), as well as the recent executions and all details about it (inputs, trigger, creation date…).
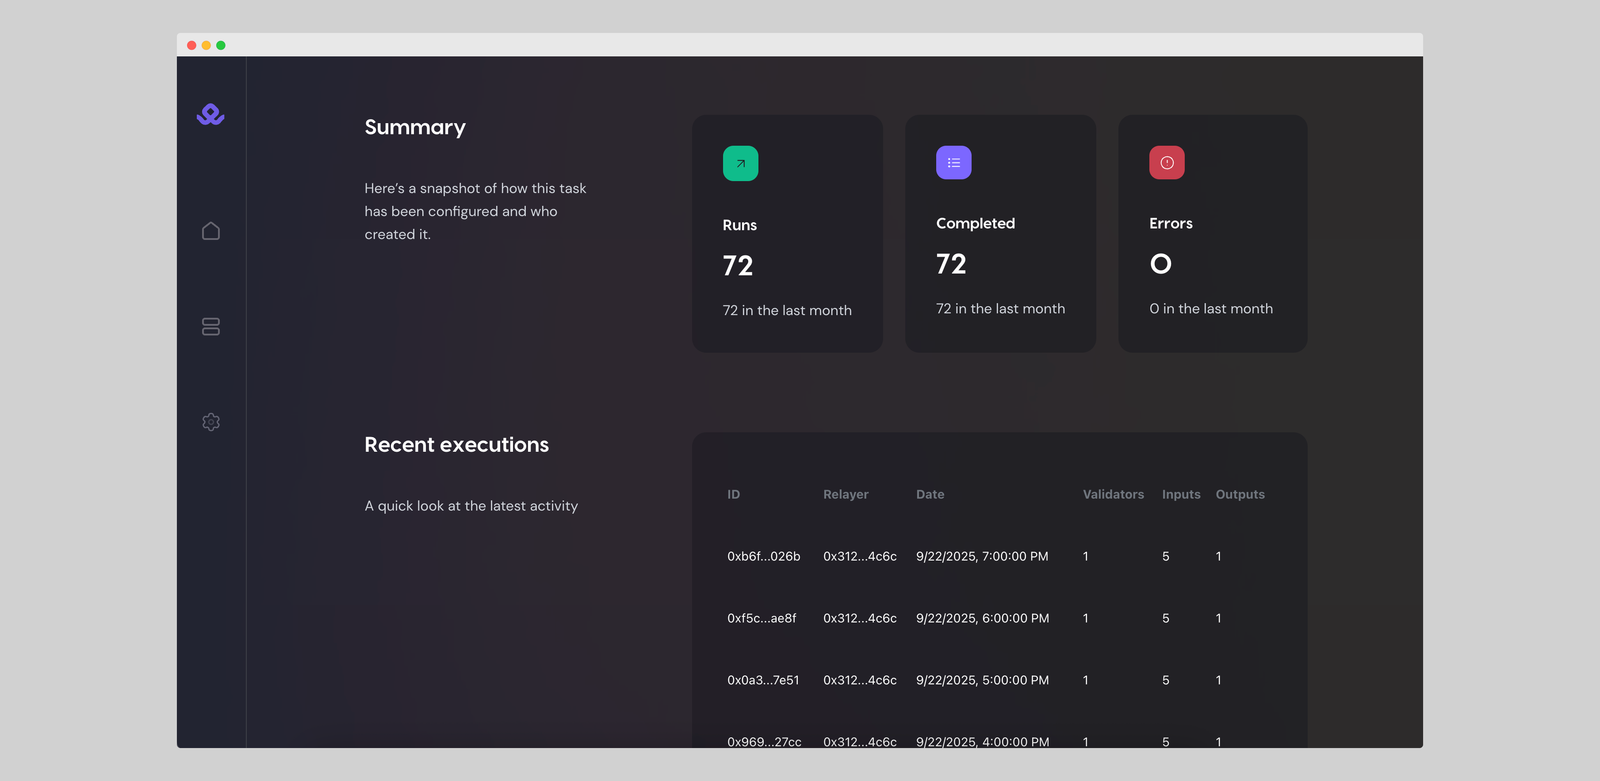
If you press on any of the recent executions, you can get a full execution detail, with info such as inputs, outputs, general details, logs, and more.
You can run multiple functions at the same time, and you can make changes to the configuration by creating a new function, without needing to redeploy the function code again.
Notes & Variations
You will need:
- Wallet with funds (for gas and token approvals)
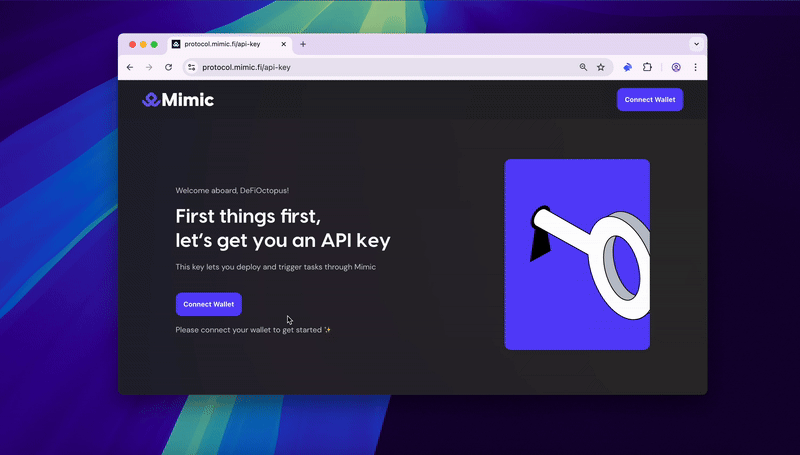
- API key from Mimic Explorer: https://protocol.mimic.fi/api-key
Remember to give allowance to the Mimic settler for the tokens you want to rebalance.
In this example USDC, WETH, and cbBTC on Base. You can go to the smart contracts on basescan, connect your wallet, and add approval to the Mimic settler: 0x609d831c0068844e11ef85a273c7f356212fd6d1
- Extend to N tokens (you can add more tokens to the rebalancing).
👉 With this, you’ve got a production-style wallet rebalancer: USD-aware, slippage-protected, self-contained, and easy to operate via signed configs in Explorer.
Wallet Rebalancing is Only the Beginning
With Mimic Protocol, setting up a wallet rebalancing strategy is no longer about writing and maintaining bots, custom scripts, or handing funds over to custodial services. You define the rules once in a function, sign them, and let Mimic relayers execute on your behalf, directly from your wallet or treasury.
But Mimic Protocol can be used for many other use cases around blockchain automation: auto-investing, yield auto-compunding, DCA, fee management, and many more!
Stay tuned for future guides and details on what automation can unlock onchain. Mimic is the automation engine for Web3.
Get alpha access to Mimic Protocol by clicking below 👇

Start simplifying how you code, execute, and scale blockchain projects. Let automation handle the busy work while you focus on building.
🐦 X (Twitter) | 📚 Documentation | 📄 Whitepaper | 💬 Discord | 🌐 Website | 🌀 Farcaster | 💼 LinkedIn